Showing posts with label moms. Show all posts

Sunday, April 11, 2010

week 7 & 8, my basket cake


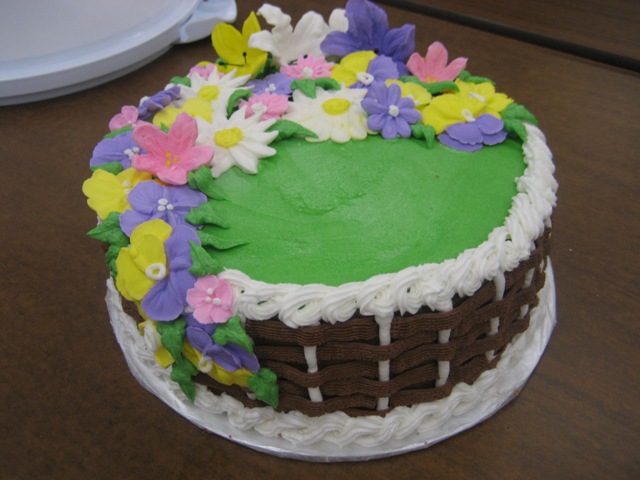
This cake was the culmination of two weeks work. In week 7 I learned how to make royal icing flowers and week 8 was about decorating the cake to put them on.

I started the flowers by making the royal icing, it's pretty easy, 3 ingredients, powered sugar (in the world of baking called 10x) meringue powder and water. You mix this until you have a thick paste like toothpaste. The key is keeping it from drying out which ultimately is the idea but, not before you've created the flowers. These actually taste okay, but, then again why wouldn't they, they are pretty much pure sugar! Once in the class, the first ting I did in getting ready to make these little flowers was to cut little squares of wax paper to use as the base for the flowers. I mixed 4 colors of Icing and stared making flowers. I learned how to make daffodils, Pansy's, Lilly's, Daisy's and a few fantasy flowers. Fantasy flowers as my instructor calls them are made up flowers that look pretty. My flowers turned out okay, not as refined as the professionals make but, heck, I'm just learning and everyone has gotta start somewhere!

Week 8 was about the cake. This week again started with trying to find a great recipe. I decided to do chocolate with a twist, Orange. I used orange juice in the batter, it was kind of cool the way it was Incorporated, I heated up a cup of orange juice and then mixed my cocoa powder into it, it made a chocolate orange kind of syrup. That was then added to the batter and Ta-da, a Chocolate Orange cake. For the filling I found a recipe that used pudding, cool whip and orange extract, when combined it was like eating a dreamsicle, a personal childhood favorite! One of the things I now do, when making all my cakes that makes it easier to get them out of the pans and helps with handling, is to line the bottom of my pans with parchment paper before I grease and flour the pans.

Now, it's class time and time to assemble the cake. I came to class with the cake pre-frosted, green on the top and brown on the sides. Instead of coloring the buttercream brown, I made a chocolate buttercream. Once in the class, I start piping on white vertical lines that define the basket weave. Then I add the chocolate buttercream using a basket weave tip. Over the line, skip to the next line and over again, then alternate these down the cake and when you've gone around and around, it looks like a basket! It's an easy technique but my piping could have been tighter, it's a good thing the base frosting under it was also chocolate to camouflage this a bit. Once that was finished I learned two new borders for the top and bottom of the cake. That was pretty much it, next I get to add the flowers.


I had my flowers ready to go, one thing I learned about these royal icing flowers is that you can make bunches and they last a really long time. But, you have to store them in a box that can have air circulation, like a shoe box. If you put them is a plastic type box moisture can build up and break down the flowers. This part of the decorating was fun, oh, except for one thing. I made some Lilly's and used a form, kinda like a funnel shape lined with little tin foil squares. When I made them I put some Crisco on to keep the flowers from sticking, but, when I went to put them on the cake, I learned I had not used enough Crisco and broke most of them trying to get them off the foil. Oh well, lesson learned!
This cake completed my 8 week session at a cake shop called Kake Kreations. It's a great store with everything you need to make your cakes. Mary was my instructor and she was great! I loved making the cakes with them and have been so inspired, I've decided to kick it up a notch and take a professional baking course at a local bakery that makes the most amazing cakes! More about them on the next post, keep in touch!!!!
Thanks Mary!!

Sunday, February 28, 2010

#4 My Book


Well, I've completed another cake. This weeks goal was learning how to make roses. So, the plan was to make the classic book cake adorned with roses. It's one of those cakes that you see at every old school bakery.

Since this was not a layered cake I went back to chocolate and started looking for a recipe. I found one of those almost from scratch recipes where you use a box mix and add pudding and chocolate chips to it. I have discovered that the icing I've been making for the classes doesn't agree with me so, I've got to have a great cake since I can't eat the icing.

I made a double batch because I wanted to make sure I had a nice thick cake. Once I had the cake baked, I put the crumb coat on and into the freezer it went. Since I had some extra batter, I made some cupcakes for the kids to decorate. They mixed their favorite icing colors and had a blast using my decorating tips to decorate their own cupcakes. For dessert we got to eat the girls cupcakes and I discovered one problem. I didn't think they were that great and after last weeks orange layered cake, this just would not do. Now, I had to figure out what to do with the cake I had made and believe it or not, it kept up that night. In the morning I had the solution, I bought a can of chocolate fudge frosting, put it on the cake and delivered it to Emmy's preschool, the kids loved it!

If at first you don't succeed, try-try again! So, I quickly made a new cake, this time I made it from scratch. It was a pretty easy recipe and contained 1 cup of coffee which really came together to make moist cake. This week I also substituted the vanilla extract in the cake and icing with almond extract. It smelled great! One note here, this was a very expensivve cake because I broke a gear in my mixer making the large batch of icing and it cost $150 to fix it, YIKES!

Once in class, I set up my station ready to begin the carving. Sorry to say, I forgot my camera so, I was not able to take any pictures of the work. Getting started I first had to carve a "v" in the center of the cake about 2" wide and then angle both sides of the cake to get the book effect. I applied a new crumb coat to the newly carved areas and the cake was taken to the fridge to set up a bit. Now, I had to choose my colors. This week I decided anything except pink and purple, so I made coral (I mixed pink and orange and it was really pretty) for my roses and yellow for the trim.

With my icing colors ready and my instructor brought the cake back and I started by piping on the stems and then made the roses. I found them surprisingly easy, a glob of icing in the center of the flower nail and then arches of icing as I rotated the nail. Pretty cool! I set them on the cake and used the leaf tip to make leaves around the roses and on the stems. The next step was the boarder around the cake. This time I used a star tip and made large connecting tear drops. It went pretty fast. Now to finish the cake, I had to write something and keeping my girls in mind I decided it would be "Once upon a time". To finish it all off I had a large tip that makes a ribbon for the book mark. For this I striped the bag. This means I took my decorating bag and created stripes on the sides of the bag so when squeezed through the tip it made a striped effect. Done!!


Promptly at 6:30, my door bell rang and the neighborhood tasters were here. We cut the cake and everyone loved it, but then again who doesn't love cake! This has been great for my ego!;-)
Next week a garden of cupcakes! Yum.......


Saturday, February 13, 2010

Cake Class 101!

I've taken my first cake class and it was so much fun! Wait, lets back up a little bit. I found a listing on a newsletter about a cake decorating class, something I've always wanted to do so, I thought, why not? I scheduled my orientation and took my first step. When I arrived I saw all these women working on cakes in the middle of the shop. They have the class set up that you can work at your own pace on your own time, my kind of class! Everyone was working on different cakes at different levels and the teacher walked around and personally instructed each student. Let me also say, the class is pretty cheap and looked like fun, so I signed up!
Then they handed me the list of supplies I needed to buy- pans, tips, frosting bases, knives, spatulas, spoons and cake carriers to name a few. It was like having another child, I secretly wished there was a registry, so much for the class being cheap! But, I forged ahead into the sugary madness to cake decorating. They sent me home with my list of supplies to buy and what I needed to bring back for my first class. I was going to be making a butterfly cake, what fun!